> ## Documentation Index
> Fetch the complete documentation index at: https://docs.zayo.com/llms.txt
> Use this file to discover all available pages before exploring further.
# Provisioning Internet Access with a DIA Connection
> A comprehensive guide to provisioning a DIA connection, from finding a port to configuring firewall, NAT, and DDoS protection.
**Use Case Overview**
This guide will walk you through how to provision Internet access by finding the right port, creating a Dedicated Internet Access (DIA) connection, ordering public IPs, configuring network settings, and setting up security features.
Before you can add internet access, you need to identify and select the specific port you'll be using in the Portal.
1. **Log in** to the Portal.
2. Navigate to the **Build Your Network** section.
3. From the left-side inventory menu, choose **Ports**. This will display a list of your existing ports.
4. Select the port you intend to use for internet access and review its details (connection type, location, etc.).
5. Confirm that the **Available Bandwidth (BW)** on the port is sufficient for your planned internet access speed.
A Port must be deployed in the physical location where you wish to route traffic.
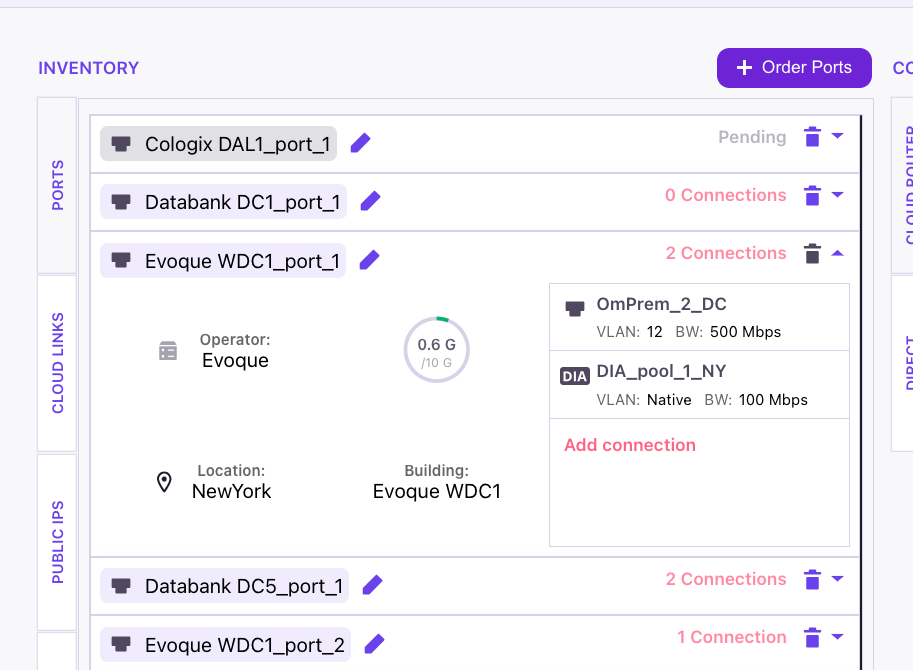 A Dedicated Internet Access (DIA) connection provides reliable, symmetrical bandwidth. This process includes ordering the necessary Public IP addresses required for external connectivity.
1. In the connection setup screen, select the **Direct** tab, as a DIA is a direct connection.
2. Choose your desired port from the inventory and click **Add Connection**. The A-Side of the connection will be populated automatically.
3. **Configure VLAN:** Enter an unused VLAN ID or select "Native" for an untagged connection. This VLAN will deliver the DIA service on your port.
4. **Select Bandwidth:** Choose your desired bandwidth from the dropdown menu.
5. **Assign Public IPs:** For the Z-Side, select the **DIA Internet** tab. Use the "Public IP" dropdown to select or request a block of public IPs for your chosen location.
6. **Finalize:** Enter a descriptive name for the connection and click **Add** to complete the setup.
**Manual Public IP Reservation:** You can order Public IPs in advance from the **Public IPs** tab in your inventory. This is useful for network planning before a port is physically available.
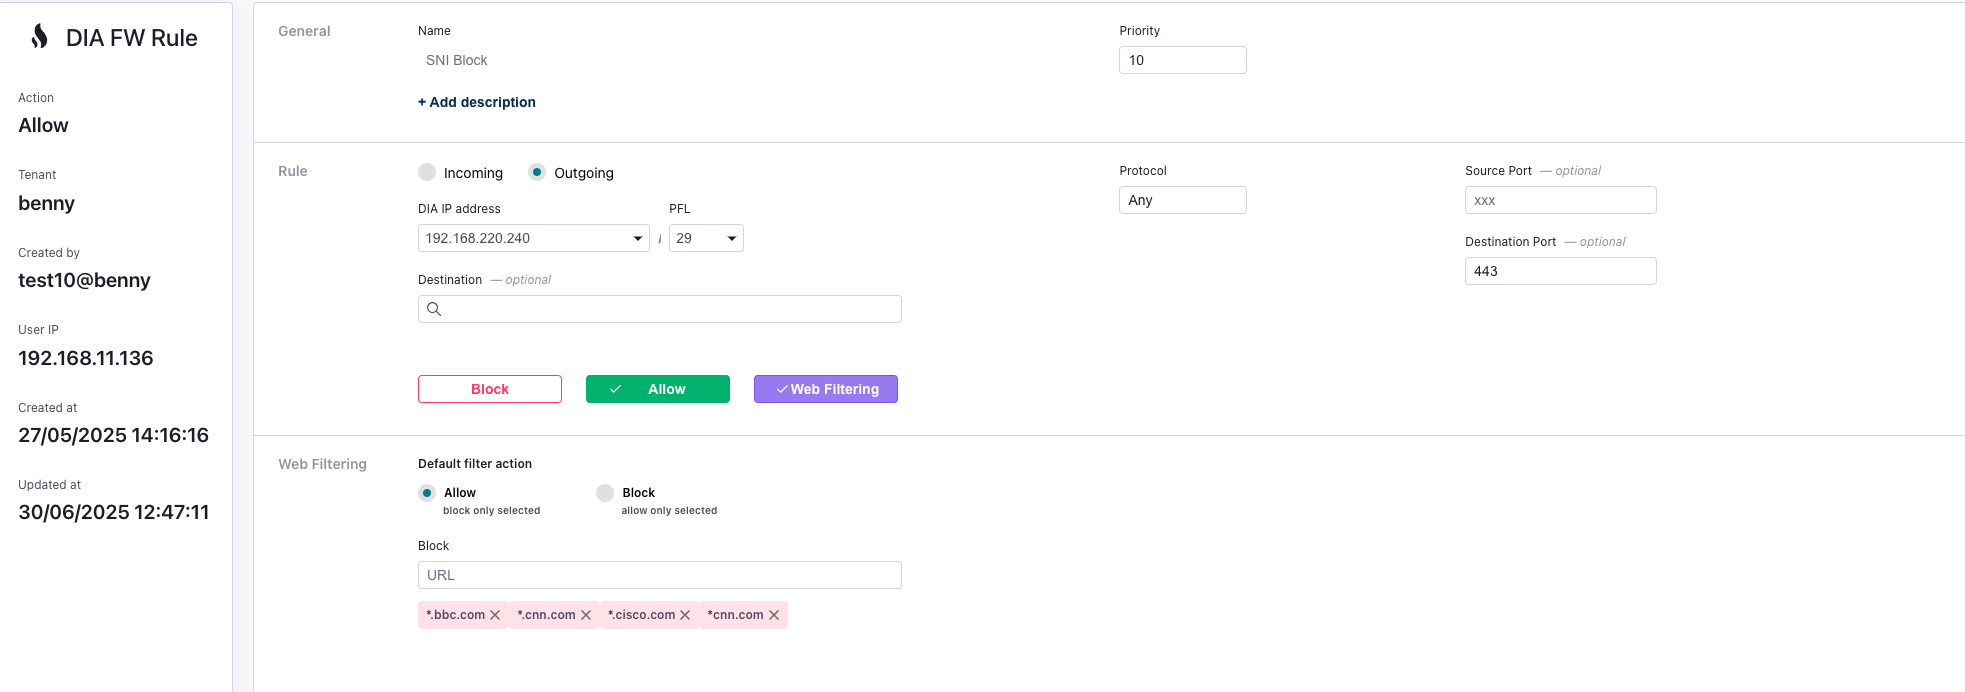
The DIA Firewall protects your connection by filtering traffic. By default, it allows all outgoing traffic and blocks all incoming traffic. Web filtering provides granular control over web access.
1. From the left-hand menu, navigate to **My Services** and ensure the **DIA Firewall** service is enabled.
2. Under the **Service** menu at the bottom, select **DIA Firewall**.
3. Click the **+** button next to your DIA's name to create a new rule specific to that connection.
4. **Complete the Firewall Rule Form:**
* **Name:** Give the rule a unique name (e.g., `Allow-SSH-Inbound`).
* **Priority:** Set a priority (lower numbers are processed first).
* **Direction:** Choose `Incoming` or `Outgoing`.
* **Source/Destination:** Specify IP addresses and ports.
* **Action:** Choose `Block`, `Allow`, or `Web Filtering`.
5. If you select **Web Filtering**, you can define specific URLs or patterns to allow or block, which is ideal for managing access to specific services like OS update servers.
6. Click **Add** to save and activate the rule.
A Dedicated Internet Access (DIA) connection provides reliable, symmetrical bandwidth. This process includes ordering the necessary Public IP addresses required for external connectivity.
1. In the connection setup screen, select the **Direct** tab, as a DIA is a direct connection.
2. Choose your desired port from the inventory and click **Add Connection**. The A-Side of the connection will be populated automatically.
3. **Configure VLAN:** Enter an unused VLAN ID or select "Native" for an untagged connection. This VLAN will deliver the DIA service on your port.
4. **Select Bandwidth:** Choose your desired bandwidth from the dropdown menu.
5. **Assign Public IPs:** For the Z-Side, select the **DIA Internet** tab. Use the "Public IP" dropdown to select or request a block of public IPs for your chosen location.
6. **Finalize:** Enter a descriptive name for the connection and click **Add** to complete the setup.
**Manual Public IP Reservation:** You can order Public IPs in advance from the **Public IPs** tab in your inventory. This is useful for network planning before a port is physically available.
The DIA Firewall protects your connection by filtering traffic. By default, it allows all outgoing traffic and blocks all incoming traffic. Web filtering provides granular control over web access.
1. From the left-hand menu, navigate to **My Services** and ensure the **DIA Firewall** service is enabled.
2. Under the **Service** menu at the bottom, select **DIA Firewall**.
3. Click the **+** button next to your DIA's name to create a new rule specific to that connection.
4. **Complete the Firewall Rule Form:**
* **Name:** Give the rule a unique name (e.g., `Allow-SSH-Inbound`).
* **Priority:** Set a priority (lower numbers are processed first).
* **Direction:** Choose `Incoming` or `Outgoing`.
* **Source/Destination:** Specify IP addresses and ports.
* **Action:** Choose `Block`, `Allow`, or `Web Filtering`.
5. If you select **Web Filtering**, you can define specific URLs or patterns to allow or block, which is ideal for managing access to specific services like OS update servers.
6. Click **Add** to save and activate the rule.
 Network Address Translation (NAT) allows devices in the private IP space of the Cloud Router to access the internet using the public IP of your DIA connection.
1. Under the **Service** menu at the bottom, select **NAT**.
2. Click the **+ Add** button to create a new NAT rule.
3. **Name** the rule and select the **Type** as `Source NAT`.
4. For the **Inside** field, specify the internal IP range that will use this rule.
5. For the **Outside** field, choose the DIA connection you created earlier.
6. Optionally, add protocol and port filters to further restrict traffic.
7. Click **Add** to save the rule.
The ARP (Address Resolution Protocol) table is useful for Layer 2 troubleshooting, showing which devices have been learned on your network interfaces.
1. Navigate to **Network**, then **DIA**.
2. Select the **ARPs** tab.
3. Here you can view a table of active ARP entries, including the IP address, corresponding MAC address, virtual interface (your DIA name), and age of the entry.
4. Observing multiple IPs mapped to a single MAC address can indicate they belong to a single router interface or physical device.
DDoS protection safeguards your network from distributed denial-of-service attacks.
1. Under the **Service** menu at the bottom, select **DDoS**.
2. The main screen displays the current attack status. A green tile indicates "quiet time," while a red tile indicates an ongoing attack.
3. During an attack, you can view details and traffic graphs showing clean vs. mitigated traffic.
4. Click the **>>** icon to open the **DDoS Rules** screen, where you can modify protection types or switch rules to a "monitor only" mode.
***
Congratulations! You have successfully created a new, fully protected DIA connection.
Network Address Translation (NAT) allows devices in the private IP space of the Cloud Router to access the internet using the public IP of your DIA connection.
1. Under the **Service** menu at the bottom, select **NAT**.
2. Click the **+ Add** button to create a new NAT rule.
3. **Name** the rule and select the **Type** as `Source NAT`.
4. For the **Inside** field, specify the internal IP range that will use this rule.
5. For the **Outside** field, choose the DIA connection you created earlier.
6. Optionally, add protocol and port filters to further restrict traffic.
7. Click **Add** to save the rule.
The ARP (Address Resolution Protocol) table is useful for Layer 2 troubleshooting, showing which devices have been learned on your network interfaces.
1. Navigate to **Network**, then **DIA**.
2. Select the **ARPs** tab.
3. Here you can view a table of active ARP entries, including the IP address, corresponding MAC address, virtual interface (your DIA name), and age of the entry.
4. Observing multiple IPs mapped to a single MAC address can indicate they belong to a single router interface or physical device.
DDoS protection safeguards your network from distributed denial-of-service attacks.
1. Under the **Service** menu at the bottom, select **DDoS**.
2. The main screen displays the current attack status. A green tile indicates "quiet time," while a red tile indicates an ongoing attack.
3. During an attack, you can view details and traffic graphs showing clean vs. mitigated traffic.
4. Click the **>>** icon to open the **DDoS Rules** screen, where you can modify protection types or switch rules to a "monitor only" mode.
***
Congratulations! You have successfully created a new, fully protected DIA connection.